For Safe and Secure online transactions SSL is mandatory. Now if we are planning to use Varnish with our Magento then this something cannot be achieved using Varnish alone because it cannot handle HTTPS traffic.
In our another article Install & Configure Varnish to Use with Magento 2 we showed how to configure Varnish as frontend and Apache as backend with Magento. But that is configured to handle only HTTP traffic.
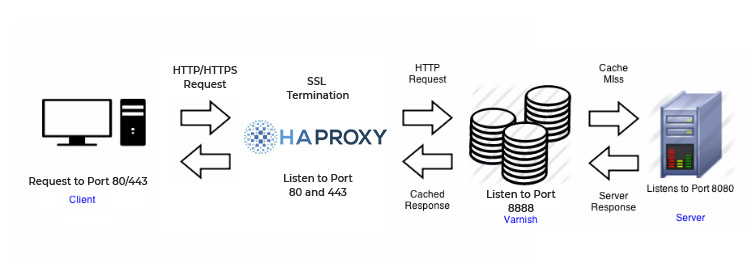
To use Varnish with SSL support we need to introduce TLS termination in front of Varnish.
There are many options for TLS Termination, but we are using HAProxy in this guide.
See the following image for better understanding
Before we proceed for HAProxy installation and configuration we would recommend you to install and configure Varnish with Magento using our Install & Configure Varnish to Use with Magento 2 guide.
We assume that you have installed Varnish on Magento Server, and it is also configured with Magento.
Let us now proceed with HAProxy installation. In order to support HTTP/2 we would be needing HAProxy version equals or greater than 1.8.
Install HAProxy
sudo apt install haproxyCheck HAProxy Version
haproxy -VIt should be greater than 1.8.
Enable HTTPS by installing Free SSL Certificates from Let’s Encrypt.
You can also use these certificates for production
sudo apt update
sudo apt install software-properties-common
sudo add-apt-repository universe
sudo add-apt-repository ppa:certbot/certbot
sudo apt update
sudo apt install certbot
sudo certbot certonly --webroot -w /var/www/html/domain.com -d domain.com
You will now see a Congratulations Message and most likely your Certificate and Chain will be saved in /etc/letsencrypt/live/domain.com
Combine Chain + Key file to use with HAProxy
sudo cat /etc/letsencrypt/live/domain.com/fullchain.pem /etc/letsencrypt/live/domain.com/privkey.pem > /etc/ssl/private/domain.com.pemIn another article where we setup Varnish to listen on Port 80 and Apache was listening on 443 will now be replaced with HAProxy.
We will be using HAProxy to listen on Port 80 & 443 and backend will be pointed on 8888 where our Varnish would be listening
Configure HAProxy
sudo nano /etc/haproxy/haproxy.cfgNow let’s add Frontend and Backend Sections at the very end of the file.
frontend www-http
   bind :80 alpn h2,http/1.1
   #http-request set-header "SSL-OFFLOADED" "1"
   reqadd X-Forwarded-Proto:\ http
   #X-Forwarded-Proto: http
   default_backend varnish-backend

frontend www-https
   bind :443 ssl crt /etc/ssl/private/domain.com.pem alpn h2,http/1.1
   #http-request set-header "SSL-OFFLOADED" "1"
   reqadd X-Forwarded-Proto:\ https
   #X-Forwarded-Proto: https
   default_backend varnish-backend

backend varnish-backend
   #redirect scheme https if !{ ssl_fc }
   server varnish :8888 check
Varnish & Apache Ports
Let’s make sure we have our Varnish listening on Port 8888 and Mod SSL is disable for Apache.
If you have followed our other article Install & Configure Varnish to Use with Magento 2 then you can open the following file:
sudo nano /etc/systemd/system/varnish.service.d/override.confand change port 80 to 8888
ExecStart=/usr/sbin/varnishd -j unix,user=vcache -F -a :8888 -T localhost:6082 -f /etc/varnish/default.vcl -S /etc/varnish/secret -s malloc,512MDisable SSL
sudo a2dismod sslRestart Varnish, Apache & Haproxy
sudo systemctl daemon-reload
sudo service varnish restart
sudo service apache2 restart
sudo service haproxy restart
Configure Magento to Purge Varnish
As we have changed the port of Varnish so we need to configure Magento again to Purge Varnish
sudo php bin/magento setup:config:set --http-cache-hosts=Your-Server-IP:8888Now lets confirm the ports
sudo netstat -tulpnWe should be having our Varnish listening on 8888, Apache on 8080 & Haproxy on 80 & 443
Make sure we have port 8888 open within our AWS Security Group.
You can now open Magento and configure it to use Secure URLs.
Varnish is an HTTP reverse proxy that caches content in memory in front of a Web Server. It basically reduces the load on Apache and PHP as all the cacheable pages are managed by Varnish.
Magento 2 comes with built-in support for Varnish caching, though we can continue using Full-Page cache by Magento, but it is recommended to use Varnish because of its performance.
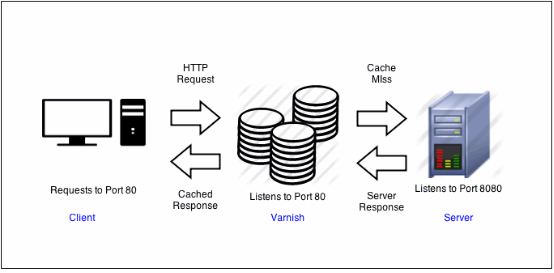
Below is an image of the setup we will be using in this step
Let us now proceed with the Varnish installation and then configuring it with Magento.
Please note that the following guide is for Ubuntu systems.
Install Varnish
sudo apt install varnishMake sure the Varnish version is 4.x or 5.x, You can check it by using the following command
varnishd -VSwitch Apache’s Default port to 8080
sudo nano /etc/apache2/ports.confthen make the following changes
Listen 8080
Now open /etc/apache2/sites-available/000-default.conf
sudo nano /etc/apache2/sites-available/000-default.confmake the following changes
<VirtualHost *:8080>
Restart Apache
sudo service apache2 restartConfigure Varnish to use Port 80
Since we are putting Varnish in front of our Web Server which is Apache so we have to configure Varnish to use port 80.
sudo mkdir -p /etc/systemd/system/varnish.service.d/
sudo nano /etc/systemd/system/varnish.service.d/override.conf
and add the following
[Service]
ExecStart=
ExecStart=/usr/sbin/varnishd -j unix,user=vcache -F -a :80 -T localhost:6082 -f /etc/varnish/default.vcl -S /etc/varnish/secret -s malloc,512M
Save and Close the file
Run the following command to regenerate dependency tree
sudo systemctl daemon-reloadRestart Varnish
sudo service varnish restartLet’s confirm by checking the ports
sudo netstat -tulpn
As you can see in the above image that Varnish is listening on port 80 and Apache on 8080.
Now we will confirm it with our Magento installation. Run the following CURL command to see the headers
curl -I -v –location-trusted ‘<your Magento base URL>’Look for headers like the following:

Configure Magento to use Varnish
In your Magento Admin go to STORES > Settings > Configuration > ADVANCED > System > Full Page Cache.
From the Caching Application list, click Varnish Caching & Save Config
Now our Magento is using Varnish cache instead of default Full-Page Cache. But we need to follow few more steps in order to configure Varnish with Magento completely.
Under Varnish Configuration within Magento change Access list & Backend Host to your Magento server IP and hit Save Config
Make sure you open 8080 port for your server instance on AWS since our Apache is listening on 8080
Click on Export VCL for Varnish depending upon the Varnish version we have installed.
You can confirm the Varnish version by running the following command
sudo varnishd -VIn our case it is Varnish 5 so we will click the Export VCL for Varnish 5 button
Backup your existing default.vcl
sudo cp /etc/varnish/default.vcl /etc/varnish/default.vcl.bak2Rename exported varnish.vcl to default.vcl and copy to /etc/varnish/ directory
mv <download_directory>/varnish.vcl default.vcl
cp <download_directory>/default.vcl /etc/varnish/default.vcl
Now when you run your Magento Store in Browser most likely you will see the following error
Error 503 Backend fetch failed
Let’s make some changes to the default.vcl.
Remove Health Check
.probe = {
    .url = "/pub/health_check.php";
    .timeout = 2s;
    .interval = 5s;
    .window = 10;
    .threshold = 5;
   }
Remove Grace Period
sub vcl_hit {
    if (obj.ttl >= 0s) {
        # Hit within TTL period
        return (deliver);
    }
    if (std.healthy(req.backend_hint)) {
        if (obj.ttl + 300s > 0s) {
            # Hit after TTL expiration, but within grace period
            set req.http.grace = "normal (healthy server)";
            return (deliver);
        } else {
            # Hit after TTL and grace expiration
            return (miss);
        }
    } else {
        # server is not healthy, retrieve from cache
        set req.http.grace = "unlimited (unhealthy server)";
        return (deliver);
    }
}
Remove Collect All Cookies
std.collect(req.http.Cookie);Remove the Following from sub vcl_deliver
# Not letting browser to cache non-static files
    if (resp.http.Cache-Control !~ "private" && req.url !~ "^/(pub/)?(media|static)/") {
        set resp.http.Pragma = "no-cache";
        set resp.http.Expires = "-1";
        set resp.http.Cache-Control = "no-store, no-cache, must-revalidate, max-age=0";
    }

    unset resp.http.X-Magento-Debug;
    unset resp.http.X-Magento-Tags;
    unset resp.http.X-Powered-By;
    unset resp.http.Server;
    unset resp.http.X-Varnish;
    unset resp.http.Via;
    unset resp.http.Link;
Setup Magento Admin to Purge Varnish Cache
Now we need to configure Magento to purge Varnish cache from the available cache management tool within Admin. We need to use the following command
php bin/magento setup:config:set –http-cache-hosts=your-magento-server-ip:varnish-port
eg.
php bin/magento setup:config:set --http-cache-hosts=192.0.2.100:80We should be good now. Let’s Confirm if Magento is properly configured with Varnish
Check page Load time
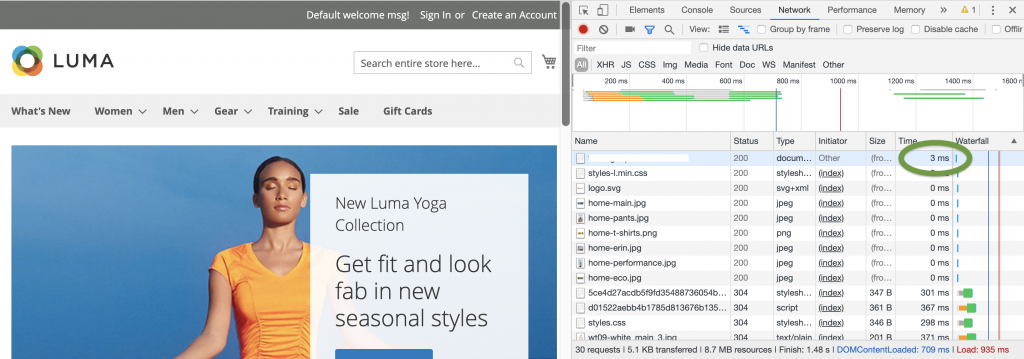
All the cacheable pages like storefront, category, product pages should load less then 150ms. Most likely once they are cached they will load in less than 10ms
To Confirm use the following steps
- Access any cacheable Magento page in Chrome.
- Right-click anywhere on the page.
- From the pop-up menu, click Inspect Element
- In the inspector pane, click the Network tab.
- Refresh the page.
- Scroll to the top of the inspector pane so you can see the URL of the page you are viewing.
Verify the Magento cache
Make sure the <magento_root>/var/page_cache directory is empty:
Log in to your Magento server, or switch to, the Magento file system owner .
Enter the following command:
rm -rf <magento_root>/var/page_cache/*Access one or more cacheable Magento pages.
Check the var/page_cache/ directory.
If the directory is empty, congratulations! You successfully configured Varnish and Magento to work together!
If you cleared the var/page_cache/ directory, restart Varnish.
You can also check our latest article Magento and Varnish with SSL Support using HAProxy
Well we all know that nobody likes a slow website, and this becomes even more crucial for eCommerce site owners. Every second delay can cost you a drop in your conversions.
Talking about eCommerce and you can’t ignore Magento. It is also our preferred eCommerce platform for eCommerce Development.
Magento comes loaded with features and flexibility for developers but this makes it a very large and complex system. Often, we receive requests from eCommerce Merchants to speed up their Magento stores.
Magento is resource hungry and deploying such a huge code base requires a highly optimised environment with supporting hardware configuration.
This guide will provide best practices and configurations for a lighting fast Magento 2 store.
Summary
- Operating System on AWS
- Apache with HTTP2
- PHP-FPM
- Apache MPM
- PHP Opcache
- Magento 2 Optimization
- Varnish with SSL using HAProxy
- PHP-FPM Tuning
- Conclusion
1. Operating System on AWS
So, before we move ahead, we need a server with operating system. In this guide we are using AWS with Ubuntu as our operating system. It is an open-source operating system but you are free to use other Linux distributions like RedHat Enterprise Linux, CentOS, Debian and similar. Please note that Magento doesn’t support Windows & Mac OS.
Memory Requirement: Magento requires at least 2GB of RAM, but we would recommend to have at least 4GB of RAM as you would be requiring third-party extensions or custom code for your store requirements.
If you would like to know how to setup a Ubuntu instance on AWS EC2 then you can check it here
Please keep in mind that you have to open port 80 for the http request. You can do this under security group in AWS console panel, Click here to see how. We would also recommend opening 443 because browsers are now forcing you to have SSL certificates for your website and you would also like to keep your store secure.
2. Apache with HTTP2
Once our Server is ready with required ports open, we can then proceed with web server installation. Magento supports Apache 2.2 or 2.4 and Nginx 1.x. In this guide we are using Apache 2.4 because it is still the most popular web server in the market and very powerful.
Step 1 – Install Apache using Ubuntu Repository
Before we install Apache i would recommend to update and upgrade the packages. Use the following command to do that
sudo apt update
sudo apt upgrade
Apache Installation
sudo apt install apache2You can now access your default Apache landing page to confirm the installation.
http://your-server-ip
Make sure port 80 is open or else it will not load.
Step 2 – Enable HTTP2
Check Apache Version
apache2 -vMost likely you will notice that Apache 2.4.29 is the current version that has been installed on our server. If in case the version is less than 2.4.24 then we will be using Ondrej PPA for latest release
To add the PPA , type:
sudo add-apt-repository ppa:ondrej/apache2Once the PPA is added, update and upgrade Apache:
sudo apt update
sudo apt upgrade
This will update and upgrade apache2 to Apache 2.4.27+.
You will now need to add the following line into your Virtual Host config files between <VirtualHost>..</VirtualHost> tags. You can also add this line to /etc/apache2/apache2.conf file if you want all of your sites to run on HTTP2
Protocols h2 h2c http/1.1Enable mod_http2
Let’s enable the Apache’s mod_http2 module by using the following command
sudo a2enmod http2Restart Apache
sudo service apache2 restartTest HTTP2
You can test your webpage to see if HTTP2 is working on your server by checking the headers or you can also check it here
3. PHP-FPM
We have our Apache installed on the server and now we should proceed with PHP installation. In this guide we are going with PHP-FPM, though the most common approach of running PHP with Apache is mod_PHP because it comes default with Apache.
But since our target is to get optimal performance for our Magento store so we will be proceeding with PHP-FPM.
FastCGI Module
Let us first start with installation of FastCGI module that is required to integrate PHP-FPM with Apache
sudo apt install libapache2-mod-fastcgiThis command will most likely throw the following error

So lets proceed to install it manually using the following command
cd /tmp && wget http://mirrors.kernel.org/ubuntu/pool/multiverse/liba/libapache-mod-fastcgi/libapache2-mod-fastcgi_2.4.7~0910052141-1.2_amd64.deb
sudo dpkg -i libapache2-mod-fastcgi_2.4.7~0910052141-1.2_amd64.deb; sudo apt install -f
PHP Installation
We will be using Ondrej PPA for installation of PHP
sudo add-apt-repository ppa:ondrej/phpOnce the PPA is added, Update and Install PHP and PHP-FPM packages
sudo apt update
sudo apt install php7.2 php7.2-fpm php7.2-common
Once installed, php7.2-fpm service will start automatically. You can confirm it by running the following command
sudo systemctl status php7.2-fpmApache Configuration
Lets enable required modules for apache configuration
sudo a2enmod actions fastcgi alias proxy_fcgiSo far so good, Let us now configure our sites on Apache to run with FPM/FastCGI.
Since we currently didn’t setup any Virtual Hosts so we will be making this change to the 000-default.conf which you will find in /etc/apache2/sites-available/
Add the following within your <VirtualHost> … </VirtualHost> tags
<FilesMatch \.php$>
    # 2.4.10+ can proxy to unix socket
    SetHandler "proxy:unix:/var/run/php/php7.2-fpm.sock|fcgi://localhost/"

    # Else we can just use a tcp socket:
    #SetHandler "proxy:fcgi://127.0.0.1:9000"
</FilesMatch>
Save the file and restart Apache using following command
sudo service apache2 restartTest PHP-FPM
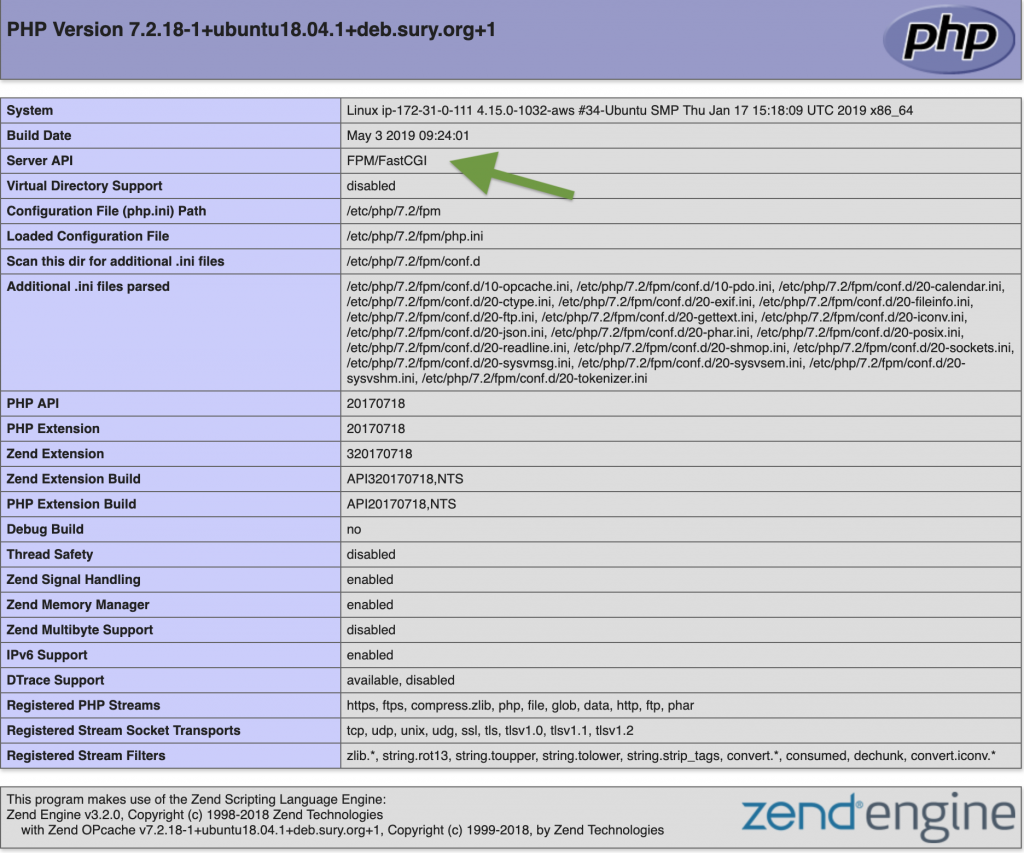
Create a info.php file containing <?php phpinfo(); ?> in /var/www/html/
Open http://your-server-ip/info.php in your browser and you will see FPM/FastCGI in Server API column.
Awesome, now we have our PHP installed but we would be requiring some PHP extensions that are required by Magento. You can install them by using the following command
PHP Extensions for Magento
sudo apt-get install php7.2-bcmath php7.2-ctype php7.2-curl php7.2-dom php7.2-gd php7.2-iconv php7.2-intl php7.2-mbstring php7.2-mysql php7.2-simplexml php7.2-soap php7.2-xsl php7.2-zipRestart PHP-FPM by using the following command
sudo systemctl reload php7.2-fpm.service4. Apache MPM
Apache uses Multi-Processing Modules (MPM) to handle and process incoming requests. There are three types of MPM in apache which are Prefork, Worker & Event MPM.
By default, Apache comes with Prefork MPM. We will not go in detail about the pros and cons of each module, but in this guide, we will be using Event MPM which was introduced in Apache 2.4 and best for managing high loads.
Let’s switch the MPM from Prefork to Event mode
sudo a2dismod mpm_prefork
sudo a2enmod mpm_event
Restart Apache
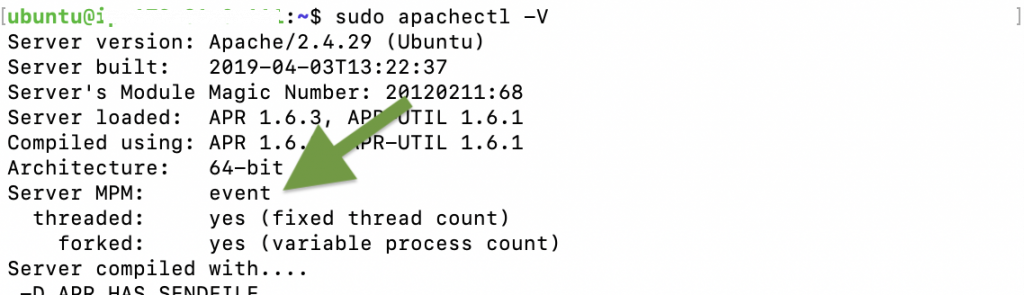
sudo service apache2 restartLet us now confirm if the Event Mode is enabled
sudo apachectl -VYou will see Server MPM: event in the output
5. PHP Opcache
Opcache is a caching extension in PHP that stores precompiled scripts in shared memory. So, it eliminates the process of compilation on each request as it is reading the precompiled script bytecode from Memory
Let us first start by enabling Opcache. Open php.ini available at the following location:
/etc/php/7.2/fpm/php.ini
Remove Semicolon in front of opcache.enable=1
Following are some recommended PHP Opcache settings for Magento 2:
opcache.memory_consumption=512
opcache.interned_strings_buffer=48
opcache.max_accelerated_files=100000
opcache.revalidate_freq=4
Save the file and restart PHP FPM
sudo systemctl reload php7.2-fpm.serviceConfirm PHP Opcache by again opening the php.info in browser
http://your-server-ip/info.php

Perfect, Now we need more extension that would be very beneficial for the performance of our Magento Store
PHP APCu
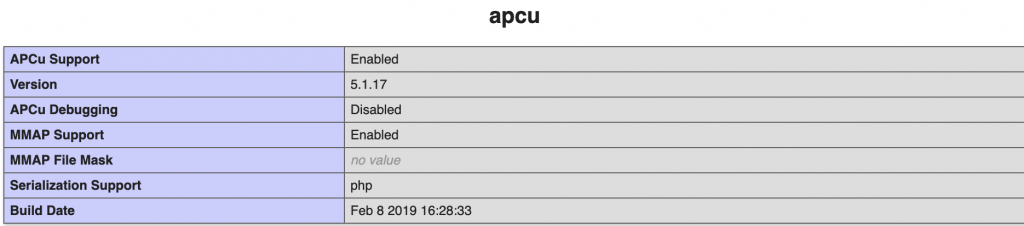
As per Magento this extension caches file locations for opened files, increasing performance for Magento server calls (including pages, ajax calls, and endpoints)
sudo apt install php7.2-apcu -yRestart PHP-FPM
sudo systemctl reload php7.2-fpm.serviceConfirm it by opening our info.php file in browser
6. Magento 2 Optimization
Our Web server is ready for Magento Installation and all we need is to have a MySQL server.
You can install MySQL on the same server, but our recommendation is to use a separate server for MySQL, preferably on Amazon RDS.
We will not cover the RDS setup in this topic and will proceed with optimizations assuming we have Magento installed on our Server with demo data.
While in Developer Mode go to
Stores > Configuration > Advanced > Developer and make the following changes
Grid Settings > Asynchronous indexing : Enable
CSS Settings > Merge CSS Files : Yes
CSS Settings > Minify CSS Files : Yes
Javascript Settings > Merge JavaScript Files : Yes
Javascript Settings > Minify JavaScript Files : Yes
Javascript Settings > Enable JavaScript Bundling : Yes
Template Settings > Minify HTML : Yes
Stores -> Configuration -> Catalog -> Catalog
Storefront > Use Flat Catalog Category : Yes
Storefront > Use Flat Catalog Product : Yes
Stores -> Configuration -> Sales -> Sales Emails
General Settings > Asynchronous Sending : Enable
System -> Index Management
Set all indexers to “Update by Schedule” mode.
Production Mode
Let’s change the mode to Production now, Login to Magento server as Magento File System Owner and run the following code
bin/magento deploy:mode:set production7. Varnish with SSL using HAProxy
Varnish is an HTTP reverse proxy that caches content in memory in front of a Web Server. It basically reduces the load on Apache and PHP as all the cacheable pages are managed by Varnish.
Magento 2 comes with built-in support for Varnish caching, though we can continue using Full-Page cache by Magento, but it is recommended to use Varnish because of its performance.
We have created a separate article for Magento and Varnish with SSL Support using HAProxy, Kindly check that for the step by step method.
8. PHP-FPM Tuning
We have successfully installed PHP-FPM, Let’s tune it for an optimal Magento performance.
PHP-FPM has three process managers that manages all the processing. These processes are Static, OnDemand & Dynamic.
We recommend Dynamic process manager for Magento 2
You can locate the PHP-FPM configuration file in /etc/php/7.2/fpm/pool.d/www.conf
Open the file and make the following changes
pm = dynamic
pm.max_children = 70
pm.start_servers = 8
pm.min_spare_servers = 4
pm.max_spare_servers = 16
pm.max_requests = 2000
Please note that these are recommended changes and may require different configurations depending upon the Site Traffic, Available RAM, Virtual Machine Configuration etc.
You can use the following method to figure out the correct values
Check Avg. Memory Consumption by Single PHP-FPM Process
ps -ylC php-fpm7.2 --sort:rssThis will output the following
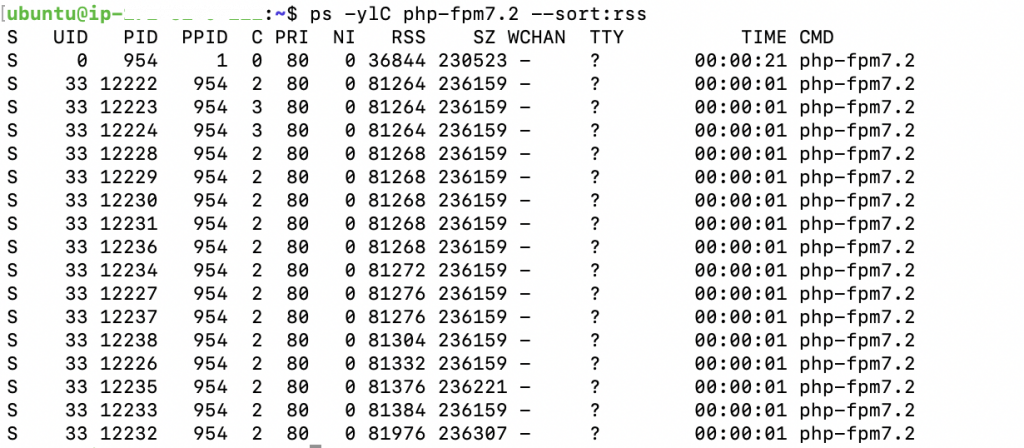
The column RSS contains the avg. memory usage per process in Kilobytes
Which mean our single PHP-FPM process is consuming about 81976/1024 = 80MB.
Let’s say we have approx. 7GB of available RAM on Server, So to calculate the max_children we will use the following formulae:
(1024 * 7)/80 = 102.
Let’s go with 70 max_children
Please also note that we have just setup the server so there is no traffic on it and almost no load on PHP-FPM processes. You can use Apache Benchmark to send requests to your server and see what is the average memory usage of PHP-FPM after that. Make sure you send requests to non-cached Magento pages like Account Sign Up or else our Varnish will be handing the requests and no load will be coming on PHP-FPM.
9. Conclusion
All the above recommendations and configurations are based on our years of experience working with Magento. Though we cannot guarantee that the above configuration would be ideal for all as every store has its own resources, traffic, customisations etc but this will for sure delivers you a great performance and you can notice it after comparing it with others who are not using them.