The arrival of Magento 2 has left many storekeepers and developers pondering about the effect…
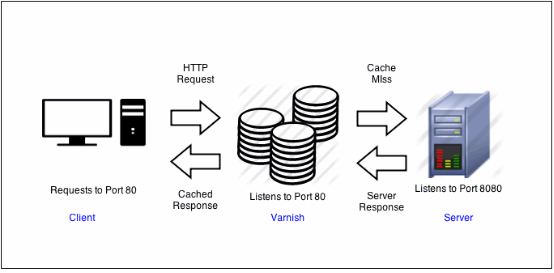
Varnish is an HTTP reverse proxy that caches content in memory in front of a Web Server. It basically reduces the load on Apache and PHP as all the cacheable pages are managed by Varnish.
Magento 2 comes with built-in support for Varnish caching, though we can continue using Full-Page cache by Magento, but it is recommended to use Varnish because of its performance.
Below is an image of the setup we will be using in this step

Let us now proceed with the Varnish installation and then configuring it with Magento.
Please note that the following guide is for Ubuntu systems.
Install Varnish
sudo apt install varnishMake sure the Varnish version is 4.x or 5.x, You can check it by using the following command
varnishd -VSwitch Apache’s Default port to 8080
sudo nano /etc/apache2/ports.confthen make the following changes
Listen 8080
Now open /etc/apache2/sites-available/000-default.conf
sudo nano /etc/apache2/sites-available/000-default.confmake the following changes
<VirtualHost *:8080>
Restart Apache
sudo service apache2 restartConfigure Varnish to use Port 80
Since we are putting Varnish in front of our Web Server which is Apache so we have to configure Varnish to use port 80.
sudo mkdir -p /etc/systemd/system/varnish.service.d/
sudo nano /etc/systemd/system/varnish.service.d/override.conf
and add the following
[Service]
ExecStart=
ExecStart=/usr/sbin/varnishd -j unix,user=vcache -F -a :80 -T localhost:6082 -f /etc/varnish/default.vcl -S /etc/varnish/secret -s malloc,512M
Save and Close the file
Run the following command to regenerate dependency tree
sudo systemctl daemon-reloadRestart Varnish
sudo service varnish restartLet’s confirm by checking the ports
sudo netstat -tulpn
As you can see in the above image that Varnish is listening on port 80 and Apache on 8080.
Now we will confirm it with our Magento installation. Run the following CURL command to see the headers
curl -I -v –location-trusted ‘<your Magento base URL>’Look for headers like the following:

Configure Magento to use Varnish
In your Magento Admin go to STORES > Settings > Configuration > ADVANCED > System > Full Page Cache.
From the Caching Application list, click Varnish Caching & Save Config
Now our Magento is using Varnish cache instead of default Full-Page Cache. But we need to follow few more steps in order to configure Varnish with Magento completely.
Under Varnish Configuration within Magento change Access list & Backend Host to your Magento server IP and hit Save Config
Make sure you open 8080 port for your server instance on AWS since our Apache is listening on 8080
Click on Export VCL for Varnish depending upon the Varnish version we have installed.
You can confirm the Varnish version by running the following command
sudo varnishd -VIn our case it is Varnish 5 so we will click the Export VCL for Varnish 5 button
Backup your existing default.vcl
sudo cp /etc/varnish/default.vcl /etc/varnish/default.vcl.bak2Rename exported varnish.vcl to default.vcl and copy to /etc/varnish/ directory
mv <download_directory>/varnish.vcl default.vcl
cp <download_directory>/default.vcl /etc/varnish/default.vcl
Now when you run your Magento Store in Browser most likely you will see the following error
Error 503 Backend fetch failed
Let’s make some changes to the default.vcl.
Remove Health Check
.probe = {
    .url = "/pub/health_check.php";
    .timeout = 2s;
    .interval = 5s;
    .window = 10;
    .threshold = 5;
   }
Remove Grace Period
sub vcl_hit {
    if (obj.ttl >= 0s) {
        # Hit within TTL period
        return (deliver);
    }
    if (std.healthy(req.backend_hint)) {
        if (obj.ttl + 300s > 0s) {
            # Hit after TTL expiration, but within grace period
            set req.http.grace = "normal (healthy server)";
            return (deliver);
        } else {
            # Hit after TTL and grace expiration
            return (miss);
        }
    } else {
        # server is not healthy, retrieve from cache
        set req.http.grace = "unlimited (unhealthy server)";
        return (deliver);
    }
}
Remove Collect All Cookies
std.collect(req.http.Cookie);Remove the Following from sub vcl_deliver
# Not letting browser to cache non-static files
    if (resp.http.Cache-Control !~ "private" && req.url !~ "^/(pub/)?(media|static)/") {
        set resp.http.Pragma = "no-cache";
        set resp.http.Expires = "-1";
        set resp.http.Cache-Control = "no-store, no-cache, must-revalidate, max-age=0";
    }

    unset resp.http.X-Magento-Debug;
    unset resp.http.X-Magento-Tags;
    unset resp.http.X-Powered-By;
    unset resp.http.Server;
    unset resp.http.X-Varnish;
    unset resp.http.Via;
    unset resp.http.Link;
Setup Magento Admin to Purge Varnish Cache
Now we need to configure Magento to purge Varnish cache from the available cache management tool within Admin. We need to use the following command
php bin/magento setup:config:set –http-cache-hosts=your-magento-server-ip:varnish-port
eg.
php bin/magento setup:config:set --http-cache-hosts=192.0.2.100:80We should be good now. Let’s Confirm if Magento is properly configured with Varnish
Check page Load time
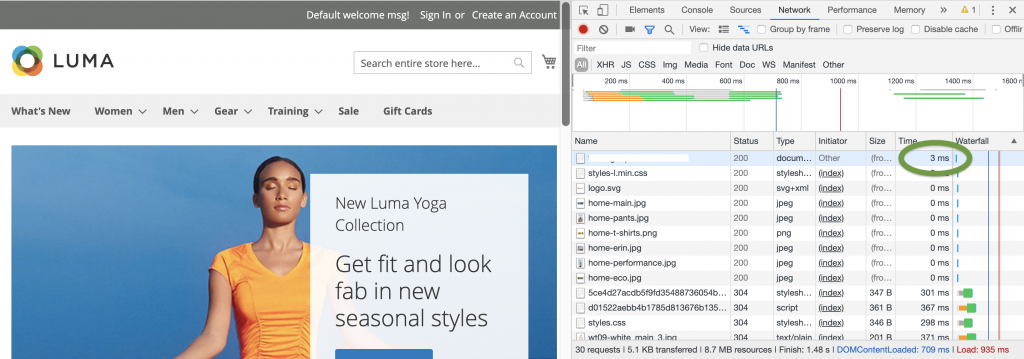
All the cacheable pages like storefront, category, product pages should load less then 150ms. Most likely once they are cached they will load in less than 10ms
To Confirm use the following steps
- Access any cacheable Magento page in Chrome.
- Right-click anywhere on the page.
- From the pop-up menu, click Inspect Element
- In the inspector pane, click the Network tab.
- Refresh the page.
- Scroll to the top of the inspector pane so you can see the URL of the page you are viewing.

Verify the Magento cache
Make sure the <magento_root>/var/page_cache directory is empty:
Log in to your Magento server, or switch to, the Magento file system owner .
Enter the following command:
rm -rf <magento_root>/var/page_cache/*Access one or more cacheable Magento pages.
Check the var/page_cache/ directory.
If the directory is empty, congratulations! You successfully configured Varnish and Magento to work together!
If you cleared the var/page_cache/ directory, restart Varnish.
You can also check our latest article Magento and Varnish with SSL Support using HAProxy


Leave a Reply